A small shop gets one chance to arrange its floor, and a small convenience store layout leaves little room for error. The room is fixed, the counter and the door are fixed, and the shelves go in once and stay for years. The convenience store layout is therefore a piece of arithmetic before it is a piece of design, and most mistakes in it come from skipping the arithmetic and drawing what looks good.
This article works through a convenience store floor plan from the floor up. It starts with the layout types and the zones of a shop, then plans one real room in numbers, and then shows what a wider aisle or a deeper shelf costs. It uses the plan from our equipment guide, an 8 m wide and 15 m deep shop, and the numbers connect to the supermarket equipment list. For the shelving itself, our industry page on convenience store shelving shows the range.
The method works for any room. Replace the 8 by 15 m dimensions, the shelf depth and the aisle width with your own, and redo the sums in the same order. The order matters, because each step fixes a number that the next one needs, and a plan done out of order has to be done again.
What the Layout Has to Do
A convenience store layout does three jobs at once, and the plan has to serve all three.
It guides the path. A shopper walks a route through the shop, and the shelves are the walls of that route. A good plan makes the route obvious, and the shopper passes most of the range on the way to the counter without being steered.
It exposes the product. A shelf is only useful if its face is seen, which means aisles wide enough to stand in, shelves at a height that can be read and no dead ends that nobody walks into.
It controls the counter. In a small shop the counter is the till, the security point and the last sales opportunity. The plan has to give staff a view of every aisle and give the queue somewhere to form that does not block the door.
Four Layout Types and Which Suits a Small Shop
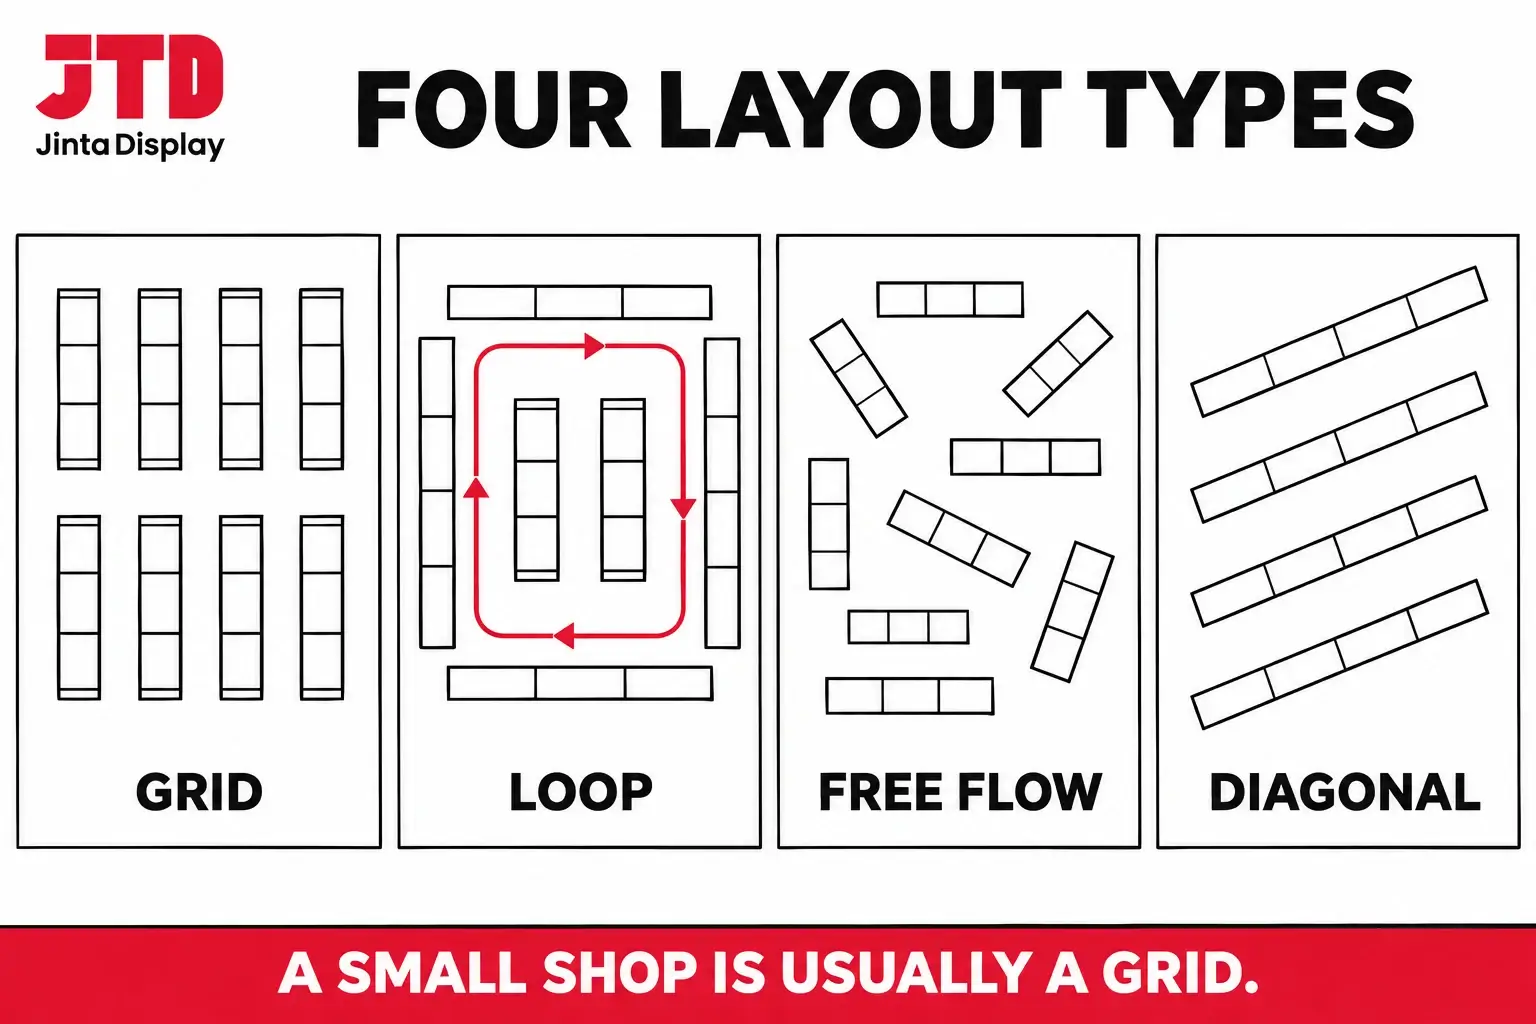
Store layouts fall into four families, and a small shop usually uses one of them with a little of another.
| Layout | How it works | Good for | Watch for |
|---|---|---|---|
| Grid | Parallel aisles with runs of shelves, wall bays around the edge | Shops that sell many small lines, the usual convenience store | A long straight view that invites shortcuts to the counter |
| Loop | A path around the perimeter with a core of islands inside | Medium shops with a clear route past the walls | Needs a wider aisle on the loop |
| Free flow | Islands placed at angles with no set path | Boutique and gift shops with fewer lines | Hard to stock and to watch |
| Diagonal | Aisles at an angle to the entrance to open sightlines to the counter | Shops where the counter is a corner | Wastes corner floor and bay lengths |
A shop of 8 by 15 m has a grid convenience store layout. The room is narrow, the counter is near the door and the stock is many small lines. A loop needs wider aisles, a free flow plan needs fewer lines and a diagonal wastes the corners of a room this small.
The Zones of a Convenience Store
Every convenience store layout has the same few zones, and the plan puts each one where it earns the most.
Entrance and counter zone. The first 3 m inside the door. It holds the counter, the basket stand and the impulse lines at the till. Keeping the counter near the door puts staff close to the entrance and keeps the queue short, and the basket stand sits where every shopper passes.
Impulse and promotion. The front of the islands and the end caps. These are the faces seen first and most often, and they carry the lines the store wants to sell now. See our guide to end caps in retail for how they are used.
Staples. Milk, bread, drinks and everyday goods are the reason people come in. Many shops put them toward the back to send the trip past the rest of the range. It is a choice and not a rule, and a very small shop may prefer them near the front for speed.
Cold and fixed equipment. Refrigerated cabinets and cold rooms take fixed positions, power and drainage, and they often take the longest walls. Plan them first, and fit the shelving around them.
Stockroom and access. A small door to the back, away from the sales floor, with a short route for refilling. The route decides how much staff time goes into restocking.
A Worked Convenience Store Floor Plan, 8 by 15 m
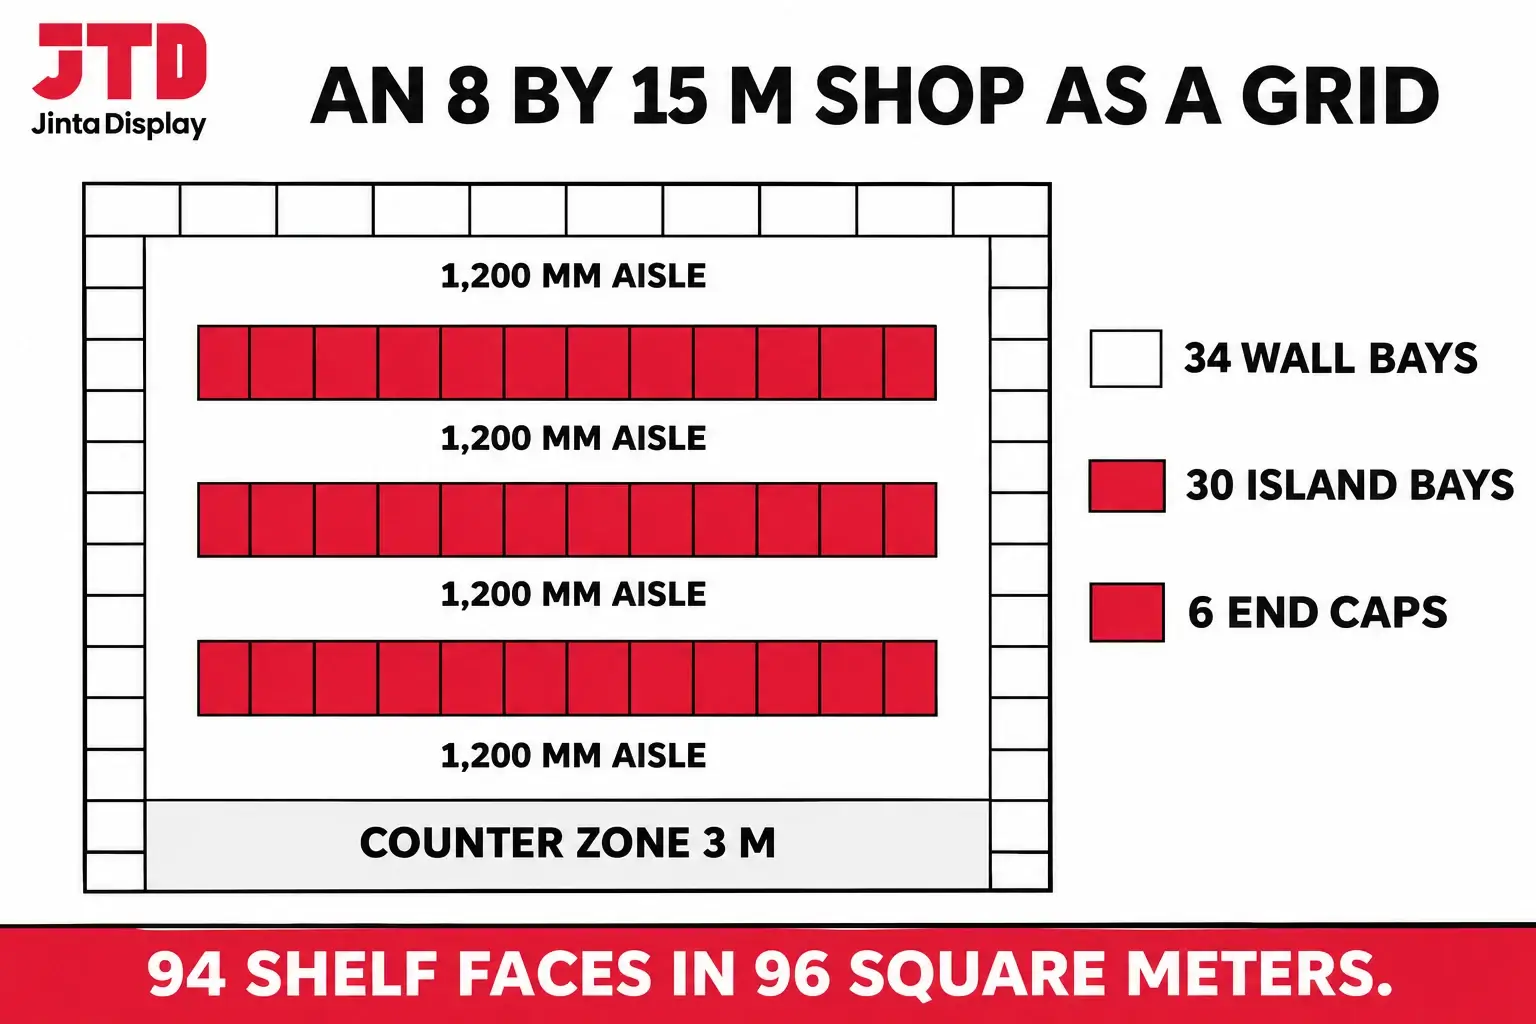
The plan below takes a shop 8 m wide and 15 m deep. The shelves are 350 mm deep, the bays are 900 mm long and the aisles are 1,200 mm wide, which is an assumption to replace with your own figure and with the accessibility rules in your area. Wall bays are 350 mm deep, and islands are 700 mm deep because they are two shelves back to back.
Across the width, the two wall bays and one aisle take 350 plus 1,200 plus 350, or 1,900 mm. Each island with its aisle takes 700 plus 1,200, or 1,900 mm. The remaining 6,100 mm holds three islands, with 400 mm to spare.
Down the depth, the counter zone takes 3 m. After that, 350 mm for the back wall bays and two cross aisles of 1,200 mm leave about 9.25 m, and each island holds 10 bays of 900 mm. The side walls carry 12 m each, giving 13 bays, and the back wall carries about 7.3 m, giving 8 bays.
| Item | Working | Result |
|---|---|---|
| Wall bays | 13 + 13 + 8 | 34 |
| Island bays | 3 islands × 10 bays | 30 |
| End caps | 2 per island | 6 |
| Shelf faces | 34 + 30 × 2 | 94 |
| Length of shelf face | 94 faces × 0.9 m | 84.6 m |
| Shelf footprint | 34 × 0.9 × 0.35 + 30 × 0.9 × 0.7 m² | 29.6 m² |
| Sales floor behind the counter zone | 8 m × 12 m | 96 m² |
The shelves occupy 29.6 m² of a 96 m² sales floor, which is about 31%, and the rest is aisle. That ratio is a useful test of any plan. A shop that uses much more than a third of its sales floor for shelves has narrow aisles, and one that uses much less is wasting stock space.
What a Wider Aisle or a Deeper Shelf Costs
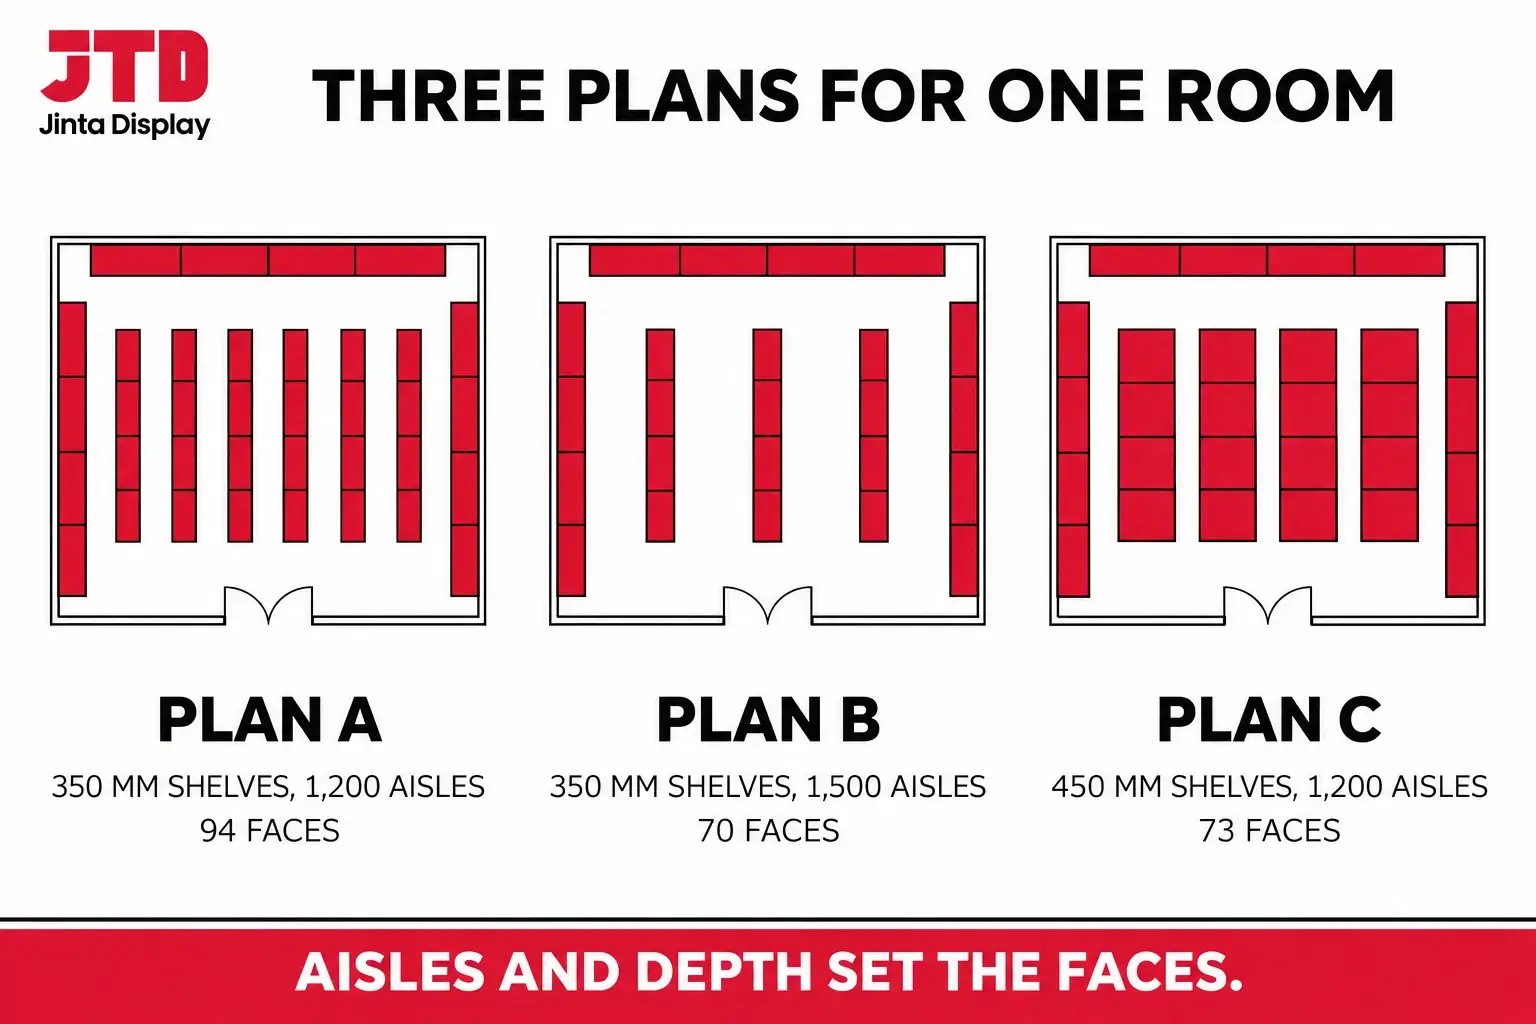
The plan above is one of three that a store owner might consider for the same room. The other two change a single number each, and the table shows the price of that change.
Plan B widens the aisles to 1,500 mm. The wall bays take 700 mm across the width, which leaves 7,300 mm for islands, and two islands with three aisles take 1,400 plus 4,500, or 5,900 mm, while a third island would need 8,100 mm and does not fit. Down the depth, two cross aisles of 1,500 mm leave about 8.65 m, which is 9 bays per island, and the back wall of 7,300 mm gives 8 bays.
Plan C keeps 1,200 mm aisles and uses 450 mm deep shelves, with islands of 900 mm. After the wall bays take 900 mm, 7,100 mm remains, and two islands with three aisles take 5,400 mm, while a third needs 7,500 mm and does not fit. The back wall of 7,100 mm gives 7 bays, and the depth leaves room for 10 bays per island.
| Plan | Shelf depth | Aisle | Islands | Wall bays | Island bays | Shelf faces | Faces × depth |
|---|---|---|---|---|---|---|---|
| A | 350 mm | 1,200 mm | 3 | 34 | 30 | 94 | 32,900 |
| B | 350 mm | 1,500 mm | 2 | 34 | 18 | 70 | 24,500 |
| C | 450 mm | 1,200 mm | 2 | 33 | 20 | 73 | 32,850 |
The last column multiplies the faces by the shelf depth, a rough measure of how much stock the room can hold. Plan B loses 26% of the faces and 26% of the stock volume, and it buys a more comfortable aisle. Plan C loses 22% of the faces but holds almost the same stock, 32,850 against 32,900, because each shelf is deeper.
That is the real choice for a shop that sells many small lines. Deeper shelves hold the same volume in fewer facings, with less variety on view. A convenience store lives on variety. Shallow shelves and more facings are the usual answer, and deep shelves suit a shop that sells fewer lines in more quantity. Our guide to gondola shelving sizes explains how shelf depth and rated load go together.
Where the Door, Counter and Cold Wall Go in the 8 by 15 m Plan
The plan above has the counter zone at the front and the island runs aimed at it. The door sits on the 8 m front wall, usually to one side, and the counter sits on the opposite side so that the entrance path crosses the zone.
Cold cabinets are the item most likely to change the arithmetic. If a run of refrigerated cabinets takes the back wall of about 7.3 m, those 8 wall bays disappear from the shelf count, and the wall bays fall from 34 to 26. The shelf faces then drop from 94 to 86, which is a loss of 8 faces for a feature the shop needs. The cabinets do add a fixed face of their own, and drinks at the back pull the shopper through the whole shop.
Put the cabinets on the longest wall that has power and drainage, and plan the shelving around them. A shop of this size rarely has a free choice of wall, and the usual compromise is to place cold stock on the back wall and a side wall, and to put dry goods on the rest. Whatever the choice, redo the count of faces once the cabinets are fixed, and use the new number for the stock plan.
Which Room Widths Fit a Convenience Store Layout Well
A convenience store layout fits some room widths much better than others, and the reason is arithmetic. Islands come in whole numbers, and the room width either has a little spare after the last island or has almost a whole extra aisle.
With 350 mm shelves and 1,200 mm aisles, the width needed for n islands is the two wall bays (700 mm), n islands of 700 mm, and n plus 1 aisles of 1,200 mm, which is 1,900 mm for each island plus 1,900 mm in all. The table works that out for common room widths.
| Room width | Islands that fit | Space left over | What it means |
|---|---|---|---|
| 5 m | 1 | 1,200 mm | Spare is nearly an aisle, widen the aisles |
| 6 m | 2 | 300 mm | Tight fit |
| 7 m | 2 | 1,300 mm | Spare is nearly an aisle, widen the aisles |
| 8 m | 3 | 400 mm | Tight fit, the plan in this article |
| 9 m | 3 | 1,400 mm | Spare is nearly an aisle, widen the aisles |
| 10 m | 4 | 500 mm | Tight fit |
| 12 m | 5 | 600 mm | Tight fit |
The pattern is simple. Rooms at 6, 8, 10 and 12 m fit a whole number of islands with 300 to 600 mm left, the margin for plinths and end caps. Rooms at 5, 7 and 9 m leave 1,200 to 1,400 mm, almost another aisle that is better used by widening every aisle by about 300 to 400 mm. In a 7 m room, for example, two islands with 1,500 mm aisles use 700 + 1,400 + 4,500, which is 6,600 mm and leaves 400 mm. The same trick works in any odd width.
The 400 mm left over in the 8 m plan is also worth a look. It is enough for plinths and for wall bays that are a little deeper than their nominal size, and it should not be given away to a larger shelf without checking the finished dimensions.
Heights, Sightlines and Security
A small shop is watched by one or two people, and the plan has to let them see the floor.
Keep the islands lower than the wall bays. Wall bays can be 1,800 mm and taller, and islands in the middle are often kept to 1,200 to 1,400 mm so that staff at the counter can see across. A tall island in the middle of a shop of this size hides the aisle behind it. The low island described in our guide to gondolas in retail is built for this.
Align the islands with the line of sight to the counter. Islands that run toward the counter let staff see down each aisle, and islands that run across the room hide the ones behind them. The plan above runs its islands from the front zone to the back, and the counter looks down all three aisles.
A convex mirror in the back corner covers the one blind spot a plan always has. Keep the high value lines near the counter, where staff can see them, and keep the counter itself clear of display that blocks the view.
If you are choosing between wall and island builds, our guide to single and double sided gondola shelving goes through the floor and frame arithmetic.
The Shopping List That Follows from the Plan
A plan turns into an order. For plan A, the shelving part of the list is short.
The wall bays are 34 single sided gondola bays, 350 mm deep. The islands are 30 double sided bays in three runs of 10, and the ends of the islands take 6 end caps. The shelves in each bay and the accessories come from the planogram, and our guide to gondola shelving accessories shows how to count the hooks, dividers and price strips for a run.
The baskets come from the demand side. With 60 customers an hour at the peak and a 10 minute visit, 10 customers are in the shop at once. If 90% take a basket, 9 are in use, and adding 20% gives about 11, and 12 is the order. Our guide to shopping basket sizes helps choose the size. There are no carts in a shop this size.
The counter follows the same demand. At 40 transactions per lane per hour, 60 customers an hour need 1.5 lanes. The plan has one main counter and room for a second till at the peak. For counters, see what a cash wrap is and checkout counter ideas.
The Counter Zone and the Queue
The 3 m counter zone is small, and a queue that spills out of it ruins the front of the shop. The arithmetic is easy to do on one page.
With 60 customers an hour at the peak, one customer arrives each minute. A lane that serves 40 transactions an hour takes 1.5 minutes for each. A single till is overloaded at the peak, since it can only clear 40 of the 60. A second till, even if a part time member of staff opens it, brings capacity to 80 an hour. That is the reason the plan has one main counter and room for a second.
The queue needs floor. If a person in a queue takes about 0.8 m of depth, which is an assumption to check against your own shop, a queue of 5 people is 4 m. That is longer than the 3 m zone, and the queue backs into the first aisle unless it runs along the counter. Plan the queue to run beside the counter and not across the entrance, and keep the first aisle clear of display that blocks it.
The basket stand belongs at the door, ahead of the queue, and shoppers pick up a basket on the way in without crossing it. For the counter itself, see our guide to what a cash wrap is.
A Finished Store on Video
Our channel has a short video of a supermarket display solution as built, which shows a full run of wall and island shelving in a finished store.
Planning for Growth and Change
A shop changes more than it first expects. A range grows, a cold cabinet is added, a promotion needs a face and a lease ends. The layout should be ready for that without a rebuild.
Use one shelving system throughout, and bays, shelves and accessories stay interchangeable. Keep a few bays of spare shelf in the plan, and put them in the islands, where they can be fitted with different shelves. Choose wall bays and islands from the same family, and an island can be moved to a wall run if the room changes. Our guide to gondola shelving accessories shows how a store changes its range by changing parts and not frames.
Order Quantities and Lead Time
Our product pages list the minimum order and the lead time. The gondola pages list a minimum order of 20 bays and a lead time of 10 to 30 days, and the basket pages list a production time of 15 days. A shop of the size in this article needs 64 bays, 6 end caps and 12 baskets. The minimum is not a problem. Confirm the quantities and dates for your own order with our team.
Order the long lead items first. Cold cabinets and any custom counter take the longest, and the shelving is fitted around them. Ask for the shelving to arrive a little before the opening to give time to fit, level and stock the bays, and keep the accessories in the first container.
Before you confirm the order, run four checks on the convenience store layout drawing. Fix the aisle width first, because it decides how many islands fit, as plan B shows, and everything else follows from it. Measure the finished run and not the nominal one, since a 350 mm shelf with a plinth and an end cap is wider on the floor, and leave the spare space the arithmetic shows. Stand at the counter on the plan and look along each aisle, because a tall island that hides the door is the costliest slip in a shop with one member of staff. Then place the fixed items, the cold cabinets, the door, the stockroom and the counter, before any shelf, since they set the room.
Leave a few spare bays in the plan as well. A shop adds lines, and shelving from one family takes new shelves and accessories without a new frame, so the next range does not need a new convenience store layout.
To start your own convenience store layout, send the room dimensions with the door and counter positions, the fixed equipment, the aisle width you want and the lines you sell, and say whether the shop is likely to change. We reply with a layout of wall and island bays, the counts and the parts list. For the range, see the supermarket shelf range and the hole back gondola, which is built single sided for a wall or double sided for an island.
For a small store served through a window, see sari sari store design. For zones, aisles and flow, see supermarket layout design. For shelf levels and facings, see visual merchandising principles for shelving. For the shelving of a larger store, see supermarket shelving.
If you are planning a shop, send us your room dimensions and aisle width and we will reply with a layout and a parts list.
Frequently Asked Questions
What is the best convenience store layout?
For most small shops it is a grid, with wall bays around the edge and islands running from the counter zone to the back. It keeps the route clear, lets staff see down each aisle and fits many small lines. A loop needs wider aisles and a free flow layout needs fewer lines.
How wide should aisles be in a convenience store?
A common planning figure is 1,200 mm, and our example uses it. Wider aisles are more comfortable but cost shelf face, and in an 8 by 15 m shop moving from 1,200 to 1,500 mm drops the shelf faces from 94 to 70. Check your local accessibility rules before fixing the width.
How much shelving does a small convenience store need?
Count bays from the plan. An 8 by 15 m shop with 350 mm shelves, 900 mm bays and 1,200 mm aisles fits 34 wall bays, 30 island bays and 6 end caps, which is 94 shelf faces. A smaller room fits fewer, and deeper shelves change the count of faces.
How do you lay out a small convenience store?
Fix the door, counter and cold equipment first. Set the aisle width, then work out how many islands fit across the room and how many bays fit down it. Add wall bays, end caps and a basket stand. Keep islands low near the counter to let staff see the floor.
Where should the counter go in a convenience store?
Usually near the door, where staff watch the entrance and the queue forms inside the shop and not at the door. Keep a clear zone of about 3 m at the front for the counter, a basket stand and impulse lines. Face the islands toward the counter for sightlines.
What shelf depth is best for a convenience store?
Shallow shelves of 300 to 350 mm give more facings in a small room, and variety is what a convenience store sells. In our example, 450 mm shelves hold about the same stock volume as 350 mm shelves but in 22% fewer faces. Choose depth by range and sales rate.
How many baskets does a convenience store need?
Estimate peak customers per hour times the visit in minutes, divided by 60, then the share who take a basket, plus about 20%. With 60 customers an hour and a 10 minute visit, that gives about 12 baskets. A shop this size does not usually need carts.
What is a c-store layout?
C-store is the common name in the United States for a convenience store, and in the UK it is closer to a corner shop. Its layout is the plan of shelves, counter and cold equipment in a small room, usually a grid with the counter near the door.